For a while I struggled with ensuring that a joint between two metal plumbing fittings did not leak. On my most recent project that required multiple threaded fittings I took some time, did my research, and finally sorted out the details.
There are four things to do that will ensure a water tight joint:
Join like metals together: Use the same, or similar, metal types for both male and female fittings. If you have copper pipe, use a copper or brass fitting. When joining dissimilar types, the threads of the harder metal can distort or destroy those of the softer metal and will result in a leak.
Use professional teflon tape: Do not use the cheapo, thin tape that you get at the commercial hardware store. Go to a professional plumbing supply store and get a thicker tape that is made for the type of metal you are using. Wrap it 3 or 4 times, and no more. Too much tape can cause it to bunch up and leak. Wrap it on the male threads, clockwise as you are looking directly at the male fitting with it pointed towards you so that when you screw it into the female fitting it continues wrapping the tape tight and not unwinding it. When applying it, unroll a bit of it and hold it to the male threads with your thumb, then wrap it around, pulling it tight into the valleys of the threads, but not too tight that it rips the tape. It is important that the tape is seated into the valleys of the threads.
Use a good quality pipe dope, and less that you think: Once the tape is applied, coat it with pipe dope. Only fill the valleys of the threads so that the ridges of the threads are still visible.
Tighten it to that “just right” torque: There is no universal torque spec for all plumbing fittings. Apply the same principle from automotive mechanics; ensure that you do not cross-thread the fitting and then tighten it until it starts to snug up and then tighten it “just a bit more” instead of “as tight as possible”. This is the most difficult part and does require some experience.
DISCLAIMER: These are my own notes learned from my own trials and tribulations of building things with concrete. They are in no way, shape or form to be taken as an expert opinion. Follow what you read here at your own risk. This is mostly notes to myself as I work through learning how to build things out of concrete.
Big Lessons Learned
Helpers
Doing this by yourself is painful. For anything more than a small job you absolutely need help. Get as many people as you can to help you.
Make a Test Piece
Before pouring 10 bags of concrete in your project, mix a bag and make something that can use and get a feel for how to mix, pour, screed, trowel, finish and cure a piece of concrete. In general the videos online and the directions on the bag that you will buy will highly simplify this process. Moreover, the amount of water that the manufacturer suggested to mix with a bag of their concrete was not nearly enough to get it to the correct consistency.
It seems that there are a number of distinct steps when building things out of concrete. I will break them down as I see them and include information about what I have learned.
Rent or Buy a Mixer If Using More Than Three or Four Bags
Not much more else to say about this . . . unless you want to get a very good workout. On the plus side, I will say I feel like I learned what the proper consistency of the mix should be.
Tools and Equipment
Heavy duty chemical resistant gauntlet gloved
Eye protection
Good dust mask
2x4s
Darby: a 1×4 with a handle on it
Rake
Hoe
Shovel
Trowel
Float
Edger
Groover
Mixing bin and/or concrete mixer
Temperatures and Weather
50 degrees F or greater for at least a week. Below 45 degrees the hydration process stops completely. If it will go below that temperature have blankets handy to keep it warm.
No rain within the first 6 hours of pouring.
Buidling and Prepping the Forms
I built forms out of a combination of plywood, 2x4s and 2x6s. In order to prevent the concrete from bonding to the surface of the wood I coated the wood with used motor oil and gear oil. The gear oil was really old and I was going to recycle it anyway. It was much thicker than used motor oil from one my cars. When I ran out of the gear oil, I at first tried used oil from a car but instead used used Motul 300v out of my track bike. The bike oil was more lightly used as I change it often. It didn’t seem to make a difference in being able to remove it from the formed concrete.
I affixed the forms to the ground with a combination of 2x4s with sharpened ends that I pounded into the ground and cutting slots in the clay soil that the plywood fit into.
If I were building a very large slab I’d have to revisit the construction of the part of the forms that affixed them to the ground.
For the box that I build, the inside walls of the form were about 8 inches taller than the top of the concrete box. This worked out really well because it made it much easier for me to just dump the concrete into the form. Had the interior wall been flush with the top of where I wanted the wall to be I would have had to put it into the form a shovel at a time.
Mixing the Concrete
This seems to be probably the most difficult part of the job to get correct. My first real project was a 45″x35″x16″ outer measurement drainage catch basin with 6″+ inch steel reinforced walls.
I should have either rented or purchased a concrete mixer, however it was a good lesson in actually lerning how to mix it correctly.
Because the structure that I was making was a concrete box with a pipe cast into it I ended up making in it two pours. The first, the bottom of the box, and the second the walls of the box with the pip cast into it.
I found a really good tutorial on how to actually mix the concrete with a rake that worked out well. Towards the end of the process I used a hoe, however I believe that I ended up mixing it too dry. The idea is to put all of the dry mix on one side of the mixing bin, then pour the water onto the other side. Then a bit at a time, drag some of the dry concrete mix into the water and completely mix it before going back to the dry pile at the other end of the bin. Continue until the whole bag is evenly mixed.
Based on my experience I would suggest using the directions on the bag as a starting point. In my case, it was just plain wrong and not enough water.
To get the amount of water consistent, create a measuring bucket and measuring out the recommended amount of water into and mark a line on it. Then, dump that water into another bucket and then fill up measuring bucket again to the line that you just marked.
Then, when mixing your first couple use the following procedure to keep track of the total amount of water your need.
Mix the initial amount of water into your mix from the second bucket
If you need more water, measure it out before adding it to your mix and add the same amount of water to your mix AND the first measuring bucket.
Keep doing this until you reach the right consistency and then RE-MARK your line on your first measuring bucket
Now you will have the correct amount of water that you can add to each batch that you mix. This is much easier than spraying a bit at a time into your mix to get it correct and makes the entire pour more consistent.
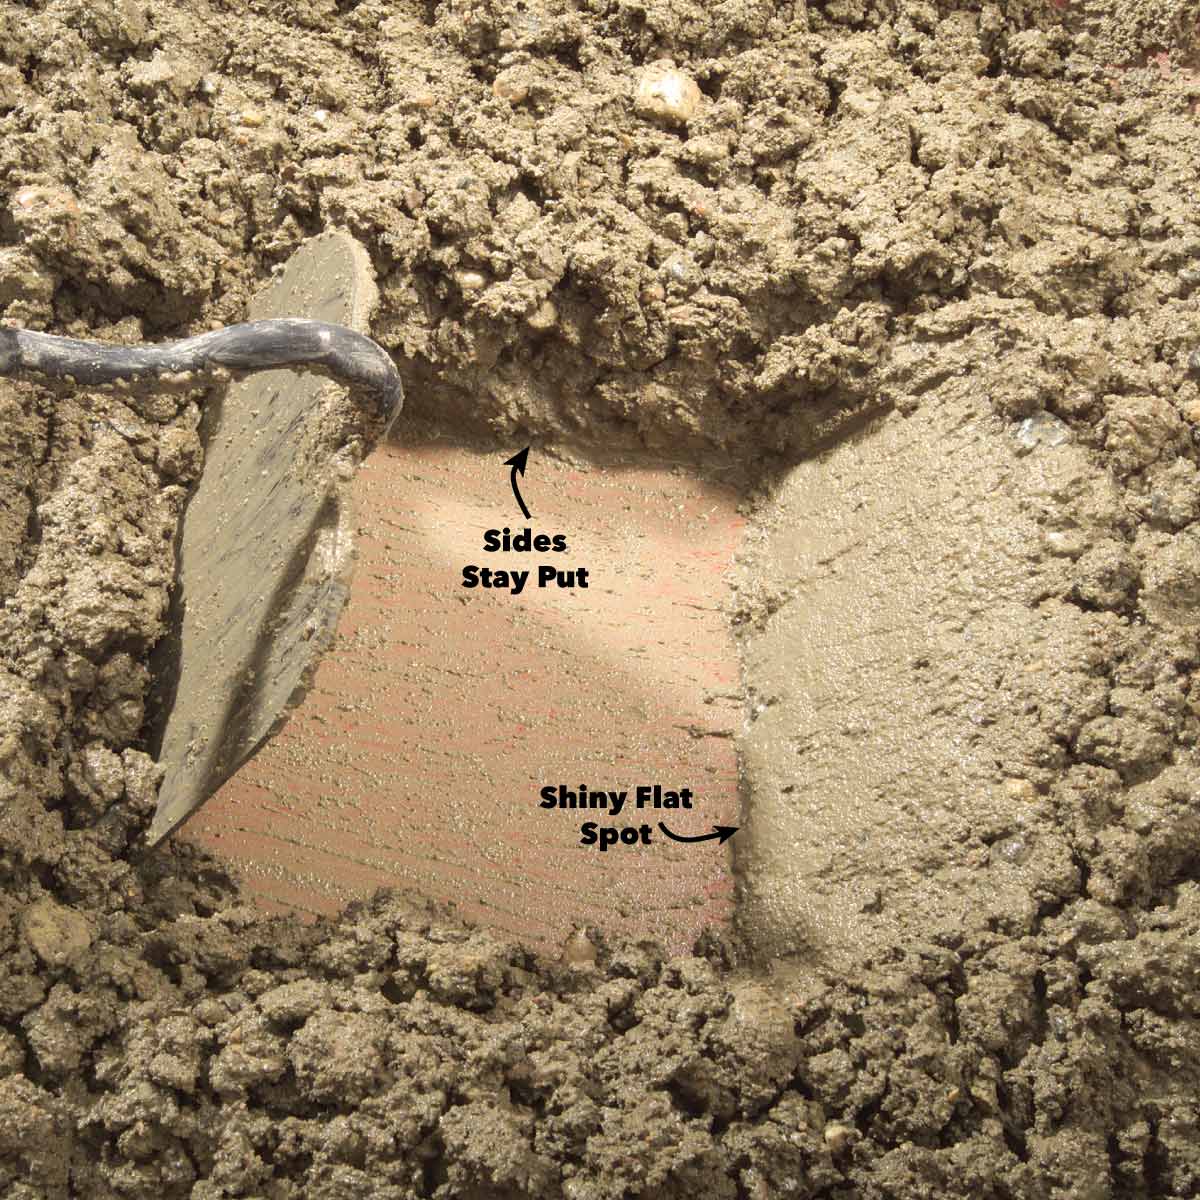
This is a very good picture that illustrates what the mix should look like. Instead of just linking the the page, I am including it here in case that site goes away.
“The mix is just right when the sides of the trough stand and the ingredients are thoroughly wetted. A hoe patted against the concrete will leave a slightly shiny surface.”
In my case, I made a big mistake and got freaked out about what I read about putting too much water in the concrete and focused too closely on the amount of water that the manufacturer suggested. Which, by the way, was not nearly enough.
Between batches, have your helper rinse off your tools so that they don’t get caked with concrete.
Pouring the Concrete
Depending on the shape of your form, you can either dump the entire wheelbarrow or mixing basin into your form or shovel it into place.
After I did a layer of concrete around the whole of the box, I poked at the concrete with a thin stake (should have used a piece of rebar) to get it to settle and consolidate and then pounded on all sides of the form with a rubber mallet.
Unfortunately, I didn’t do this for all of the layers because I got freaked out that I was pouring it to wet as I saw water percolating to the top of the layer. In retrospect, this is exactly what I should have been seeing.
I had a lip, under which I wanted to create a concrete ledge on the inside of the box. Had my concrete been wetter and of a better consistency I could have worked it under the lip by simply jiggling the surface with my (gloved) hand or the face of the hoe. Next time.
Screeding
Once the form is filled to the top, push or pull the appropriately sized 2×4 using a sawing motion as you move accross the surface using your form as a guide.
In this case, I wanted the bottom of the box to be at a slope but could not have forms in the bottom of the box. I tied string to the vertical rebar to use as a guide and simply screeded the concrete uphill to make the slope that I wanted.
Darby or Bull Float
Immediately thereafter, sweep the darby across the concrete to help smooth the surface. Do this in overlapping arcs with the leading edge of the 1×4 slightly raised. Do two passes.
The screed and darby’s purpose is to help to force the aggregate down into the piece and leave the slurry of sand and cement to fill the surface and eventually provide a smooth, solid finish.
Do not over-work the concrete at this stage or it may pull too much sand and concrete to the surface and ultimately making the surface weaker than it should be.
Waiting for Bleed Water to Evaporate
At this point water will appear on the surface of the concrete. It was during this phase when I did the first pour, the bottom of the box, that I got freaked out that I made the concrete mix too wet. When, in reality, it was probably just right. Water will come to the surface and actually sit on top of the concrete.
You will need to simply wait until it evaporates. You will know when enough of it has evaporated when the sheen is gone from the surface, and the concrete starts to harden.
At this point you can move onto the finishing stage.
Finishing
Edging
Edging will remove sharp edged from where the concrete meets the form making it less likely for the edges to break off.
Grooving
Grooving helps guide where cracks may occur.
You can use a board layed across the form to guide straight lines.
Float
Trowling
Brooming
Pulling the Forms
The concrete that I used indicated about 24 hours before pulling the forms.
When I did, I realized that I had mixed my concrete a bit too dry.
More on how I attempted to address that later.
Curing
Based on my reading curing is both an art an a science and not at all simple. It seems the most common method of curing concrete is “Wet Curing”; essentially hosing it down with water 5 – 10 times a day for the first week. Covering it also helps keep the moisture in if you cannot be so attentive to your new concrete. In that case, hose it down once a day, then cover it for the first week.
The curing process should be started once the concrete starts to harden, should not be allowed to dry fast and maintained at least the first 24 hours.
The science of it is based in the chemistry of how concrete hardens. My basic understanding of it is that the curing (also referred to as hydration) of the concrete is the process by which the water blends with the aggregate, cement, and sand to form a crystalline lattice structure that provides the strength in the concrete.
Completely cured concrete takes up to about 30 days.
It seems that the key to curing concrete properly is controlling the moisture content of the concrete. After it is hardened enough that the surface cannot be easily damaged 2 – 6 hours or so depending on the temperature and humidity, it should be gently hosed down to keep it wet. You can also put a tarp, or plastic covering, or a layer of burlap soaked in water over it. It seems the key is to not let the surface dry out such that the concrete can cure over time.
It seems it should be kept wet for at least 7 days
Drying
Painting, Staining, and Sealing
Wait at least 30 days until it is completely cured.