Admittedly, not the most savory subject. But, for those of us with pets and/or children it is sometimes a necessity to try to find a previously ingested foreign object in feces to make sure that it does not cause medical problems in the person or animal that has accidentally eaten it.
Recently, we thought our dog had eaten a relatively small magnet and figured that we would have to be checking his feces over the next few days to ensure that he passed it. I’ve not had to do this before and off the top of my head I didn’t know the best way to go about it. Turning to the Internet, all of the searches with the exact same title as this blog article turned up other articles about how long things take to move through the digestive tract. That you should call your Dr. or Vet. But nothing that specifically said how to actually search for the object in the offending matter.
Eventually, I found a blog posting on some dog owner site with a very good suggestion and here is what I did.
Collect the feces as you normally would in a poop bag and bring it home.
Cut open the bag and dump it in a quart sized or bigger ziplock freezer bag. The bigger the bag (to a point) the better.
Shake the feces to the bottom of the bag and lay it flat on your driveway, sidewalk, or similarly hard surface outside. Doing it outside makes clean-up much easier if the bag develops a rip.
Squeeze as much air out of the bag as possible while smooshing the feces out such that it is transformed into a thin layer inside the bag.
While doing so, you will easily find all but the smallest of objects just by feeling it through the bag without getting your hands dirty.
Once you identify it, you can either retrieve it from the bag and clean it off, or just toss it knowing that your child/pet has passed the item safely.
Let’s say that you have a range of lines in a source file (lines 11 – 17) that you want to comment out with a ‘#’ and a space character before the line.
To do that, you would use sed, specifying a range of lines and then specify a replacement command with a capture group as follows:
DISCLAIMER: These are my own notes learned from my own trials and tribulations of building things with concrete. They are in no way, shape or form to be taken as an expert opinion. Follow what you read here at your own risk. This is mostly notes to myself as I work through learning how to build things out of concrete.
Big Lessons Learned
Helpers
Doing this by yourself is painful. For anything more than a small job you absolutely need help. Get as many people as you can to help you.
Make a Test Piece
Before pouring 10 bags of concrete in your project, mix a bag and make something that can use and get a feel for how to mix, pour, screed, trowel, finish and cure a piece of concrete. In general the videos online and the directions on the bag that you will buy will highly simplify this process. Moreover, the amount of water that the manufacturer suggested to mix with a bag of their concrete was not nearly enough to get it to the correct consistency.
It seems that there are a number of distinct steps when building things out of concrete. I will break them down as I see them and include information about what I have learned.
Rent or Buy a Mixer If Using More Than Three or Four Bags
Not much more else to say about this . . . unless you want to get a very good workout. On the plus side, I will say I feel like I learned what the proper consistency of the mix should be.
Tools and Equipment
Heavy duty chemical resistant gauntlet gloved
Eye protection
Good dust mask
2x4s
Darby: a 1×4 with a handle on it
Rake
Hoe
Shovel
Trowel
Float
Edger
Groover
Mixing bin and/or concrete mixer
Temperatures and Weather
50 degrees F or greater for at least a week. Below 45 degrees the hydration process stops completely. If it will go below that temperature have blankets handy to keep it warm.
No rain within the first 6 hours of pouring.
Buidling and Prepping the Forms
I built forms out of a combination of plywood, 2x4s and 2x6s. In order to prevent the concrete from bonding to the surface of the wood I coated the wood with used motor oil and gear oil. The gear oil was really old and I was going to recycle it anyway. It was much thicker than used motor oil from one my cars. When I ran out of the gear oil, I at first tried used oil from a car but instead used used Motul 300v out of my track bike. The bike oil was more lightly used as I change it often. It didn’t seem to make a difference in being able to remove it from the formed concrete.
I affixed the forms to the ground with a combination of 2x4s with sharpened ends that I pounded into the ground and cutting slots in the clay soil that the plywood fit into.
If I were building a very large slab I’d have to revisit the construction of the part of the forms that affixed them to the ground.
For the box that I build, the inside walls of the form were about 8 inches taller than the top of the concrete box. This worked out really well because it made it much easier for me to just dump the concrete into the form. Had the interior wall been flush with the top of where I wanted the wall to be I would have had to put it into the form a shovel at a time.
Mixing the Concrete
This seems to be probably the most difficult part of the job to get correct. My first real project was a 45″x35″x16″ outer measurement drainage catch basin with 6″+ inch steel reinforced walls.
I should have either rented or purchased a concrete mixer, however it was a good lesson in actually lerning how to mix it correctly.
Because the structure that I was making was a concrete box with a pipe cast into it I ended up making in it two pours. The first, the bottom of the box, and the second the walls of the box with the pip cast into it.
I found a really good tutorial on how to actually mix the concrete with a rake that worked out well. Towards the end of the process I used a hoe, however I believe that I ended up mixing it too dry. The idea is to put all of the dry mix on one side of the mixing bin, then pour the water onto the other side. Then a bit at a time, drag some of the dry concrete mix into the water and completely mix it before going back to the dry pile at the other end of the bin. Continue until the whole bag is evenly mixed.
Based on my experience I would suggest using the directions on the bag as a starting point. In my case, it was just plain wrong and not enough water.
To get the amount of water consistent, create a measuring bucket and measuring out the recommended amount of water into and mark a line on it. Then, dump that water into another bucket and then fill up measuring bucket again to the line that you just marked.
Then, when mixing your first couple use the following procedure to keep track of the total amount of water your need.
Mix the initial amount of water into your mix from the second bucket
If you need more water, measure it out before adding it to your mix and add the same amount of water to your mix AND the first measuring bucket.
Keep doing this until you reach the right consistency and then RE-MARK your line on your first measuring bucket
Now you will have the correct amount of water that you can add to each batch that you mix. This is much easier than spraying a bit at a time into your mix to get it correct and makes the entire pour more consistent.
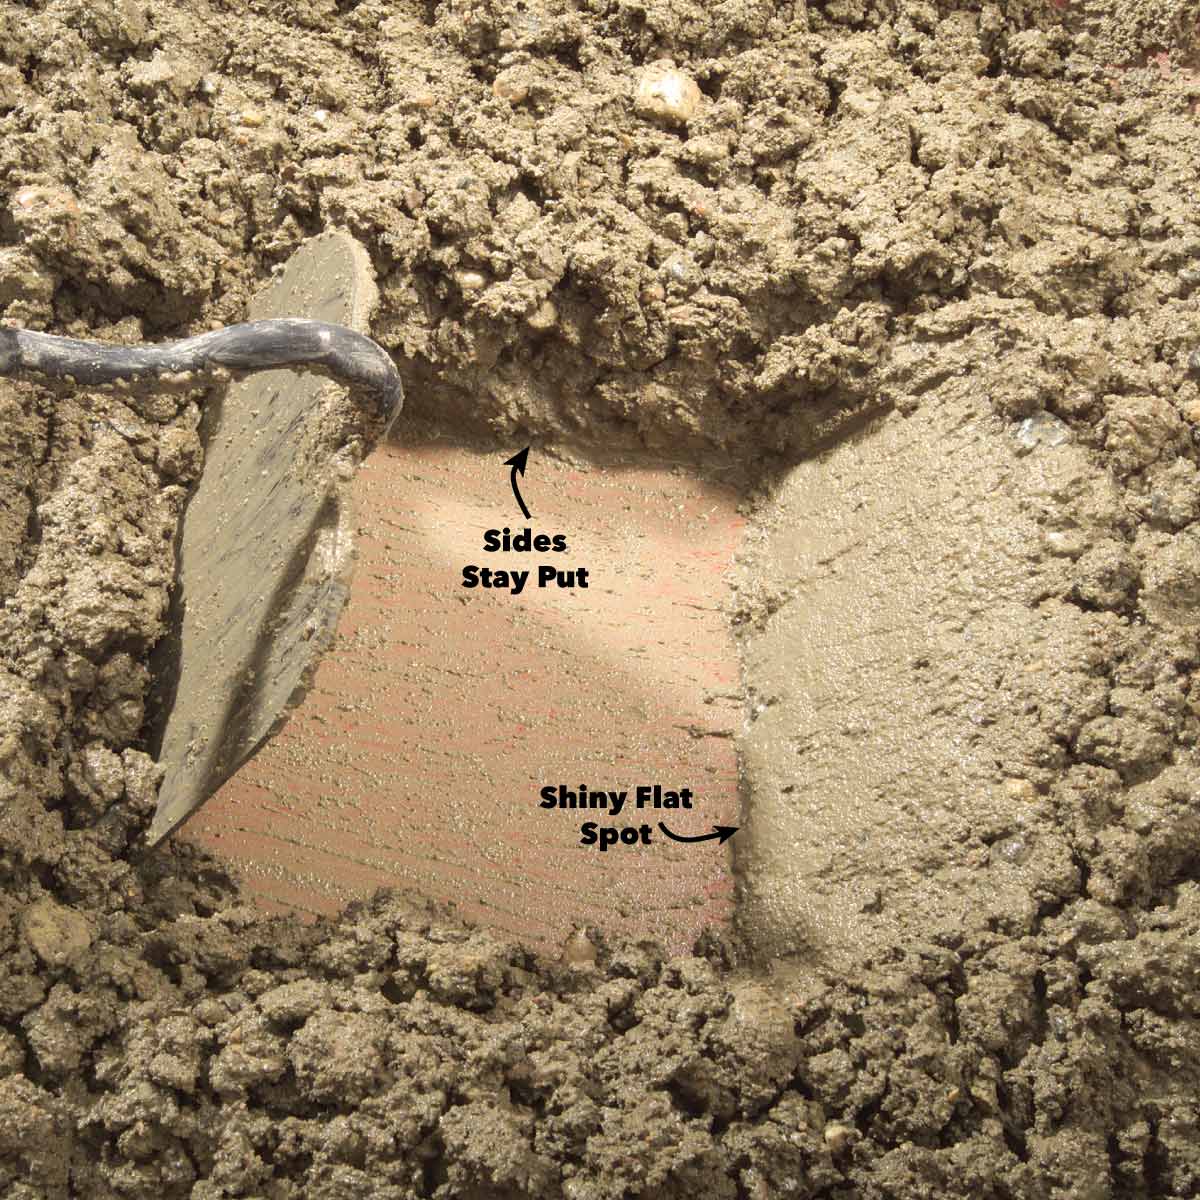
This is a very good picture that illustrates what the mix should look like. Instead of just linking the the page, I am including it here in case that site goes away.
“The mix is just right when the sides of the trough stand and the ingredients are thoroughly wetted. A hoe patted against the concrete will leave a slightly shiny surface.”
In my case, I made a big mistake and got freaked out about what I read about putting too much water in the concrete and focused too closely on the amount of water that the manufacturer suggested. Which, by the way, was not nearly enough.
Between batches, have your helper rinse off your tools so that they don’t get caked with concrete.
Pouring the Concrete
Depending on the shape of your form, you can either dump the entire wheelbarrow or mixing basin into your form or shovel it into place.
After I did a layer of concrete around the whole of the box, I poked at the concrete with a thin stake (should have used a piece of rebar) to get it to settle and consolidate and then pounded on all sides of the form with a rubber mallet.
Unfortunately, I didn’t do this for all of the layers because I got freaked out that I was pouring it to wet as I saw water percolating to the top of the layer. In retrospect, this is exactly what I should have been seeing.
I had a lip, under which I wanted to create a concrete ledge on the inside of the box. Had my concrete been wetter and of a better consistency I could have worked it under the lip by simply jiggling the surface with my (gloved) hand or the face of the hoe. Next time.
Screeding
Once the form is filled to the top, push or pull the appropriately sized 2×4 using a sawing motion as you move accross the surface using your form as a guide.
In this case, I wanted the bottom of the box to be at a slope but could not have forms in the bottom of the box. I tied string to the vertical rebar to use as a guide and simply screeded the concrete uphill to make the slope that I wanted.
Darby or Bull Float
Immediately thereafter, sweep the darby across the concrete to help smooth the surface. Do this in overlapping arcs with the leading edge of the 1×4 slightly raised. Do two passes.
The screed and darby’s purpose is to help to force the aggregate down into the piece and leave the slurry of sand and cement to fill the surface and eventually provide a smooth, solid finish.
Do not over-work the concrete at this stage or it may pull too much sand and concrete to the surface and ultimately making the surface weaker than it should be.
Waiting for Bleed Water to Evaporate
At this point water will appear on the surface of the concrete. It was during this phase when I did the first pour, the bottom of the box, that I got freaked out that I made the concrete mix too wet. When, in reality, it was probably just right. Water will come to the surface and actually sit on top of the concrete.
You will need to simply wait until it evaporates. You will know when enough of it has evaporated when the sheen is gone from the surface, and the concrete starts to harden.
At this point you can move onto the finishing stage.
Finishing
Edging
Edging will remove sharp edged from where the concrete meets the form making it less likely for the edges to break off.
Grooving
Grooving helps guide where cracks may occur.
You can use a board layed across the form to guide straight lines.
Float
Trowling
Brooming
Pulling the Forms
The concrete that I used indicated about 24 hours before pulling the forms.
When I did, I realized that I had mixed my concrete a bit too dry.
More on how I attempted to address that later.
Curing
Based on my reading curing is both an art an a science and not at all simple. It seems the most common method of curing concrete is “Wet Curing”; essentially hosing it down with water 5 – 10 times a day for the first week. Covering it also helps keep the moisture in if you cannot be so attentive to your new concrete. In that case, hose it down once a day, then cover it for the first week.
The curing process should be started once the concrete starts to harden, should not be allowed to dry fast and maintained at least the first 24 hours.
The science of it is based in the chemistry of how concrete hardens. My basic understanding of it is that the curing (also referred to as hydration) of the concrete is the process by which the water blends with the aggregate, cement, and sand to form a crystalline lattice structure that provides the strength in the concrete.
Completely cured concrete takes up to about 30 days.
It seems that the key to curing concrete properly is controlling the moisture content of the concrete. After it is hardened enough that the surface cannot be easily damaged 2 – 6 hours or so depending on the temperature and humidity, it should be gently hosed down to keep it wet. You can also put a tarp, or plastic covering, or a layer of burlap soaked in water over it. It seems the key is to not let the surface dry out such that the concrete can cure over time.
It seems it should be kept wet for at least 7 days
Drying
Painting, Staining, and Sealing
Wait at least 30 days until it is completely cured.
Alternatively, you can also generate a key cert pair to use if you have to test importing of certs
To do so, first generate a self-signed cert and an ssl key without a passphrase for your nc “server”. Place the server.key and server.cert file in /var/tmp/server-cert
while true; do { echo -e “HTTP/1.1 200 OK\r\n$(date)\r\n\r\n<h1>hello world from $(hostname) on $(date)</h1>” | nc -vl –ssl 8080 –ssl-key /var/tmp/server-cert/server.key –ssl-cert /var/tmp/server-cert/server.cert; } done
If you have just bought a new (to you) nic card or other networking device and want to test that all of the ports can pass traffic at the expected rate, as long as you have nc and the firewall ports open on a “server” with a known good nic and have nc installed on your “client” device that you want to test it is very easy to test.
Of course, if you are testing a switch itself, then it is just a matter of having two known good machines to act as the client and the server and to insert the switch between them.
Ensure that you have a high port that is allowed by your firewall. On the server side run the following to set up a listening service
nc -l -k <port> > /dev/null
Then on the client run the following:
$ dd if=/dev/zero bs=1M count=1K | nc -vn <server-ip-addr> <port> Connection to <server-ip-addr> <port> port [tcp/*] succeeded! 1024+0 records in 1024+0 records out 1073741824 bytes (1.1 GB) copied, 9.0998f s, 118 MB/s
Then, just remember to multiply the MB copied to the server by 8 to get the rate in megabits/s.
Most of this article deals with the concept of setting an expiration date on a set of keys to a reasonable time and how you can update that key as time goes by. You should set a reminder in whatever calendar system you are using to remind you to update the expiration date BEFORE it does actually expire a couple of weeks ahead of time. I typically set my keys to expire in 13 months and set my calendar to remind me after 12 or so months.
Creating a key set and distributing your public key
As mentioned, and when prompted, set a reasonable expiration time. Also create a revocation cert. See the aforementioned link for details.
Create a key
gpg2 --gen-key
List keys
gpg2 --list-keys
/data/home/rchapin/.gnupg/pubring.gpg
-------------------------------------
pub   4096R/E5170CE8 2015-03-26 [expires: 2019-03-14]
uid                  Ryan Chapin <rchapin@nbinteractive.com>
sub   4096R/-------- 2015-03-26 [expires: 2019-03-14]
Distribute Public Key (use hkps, encrypted connection)
Searching for keys and verifying that they have been posted to a public keyserver
List your keys
gpg2 --list-keys
/data/home/rchapin/.gnupg/pubring.gpg
-------------------------------------
pub   4096R/E5170CE8 2015-03-26 [expires: 2019-03-14]
uid                  Ryan Chapin <rchapin@nbinteractive.com>
sub   4096R/-------- 2015-03-26 [expires: 2019-03-14]
The public key for this user is E5170CE8. The 4096R indicates that it is 4096 bits.
Searching for the key
To search for the key via a key server such as https://pgp.mit.edu/ enter the following in the search string
0xE5170CE8
Make sure to prefix the hex value of the key with 0x to indicate to the keyserver that is a hex value and not an ASCII string.
Update the expiration date of a key:
List your keys
gpg2 --list-keys
/data/home/rchapin/.gnupg/pubring.gpg
-------------------------------------
pub   4096R/E5170CE8 2015-03-26 [expires: 2019-03-14]
uid                  Ryan Chapin <rchapin@nbinteractive.com>
sub   4096R/-------- 2015-03-26 [expires: 2019-03-14]
Edit the key
gpg2 --edit-key E5170CE8
Select the key to edit, and then run the expire command
Select the amount of time after which the key will expire and follow the prompts to enter your passphrase.
gpg> key 0
gpg> expire
Changing expiration time for the primary key.
Please specify how long the key should be valid.
         0 = key does not expire
      <n>  = key expires in n days
      <n>w = key expires in n weeks
      <n>m = key expires in n months
      <n>y = key expires in n years
Key is valid for? (0) 13m
Key expires at Thu 14 Mar 2019 08:42:22 AM EDT
Is this correct? (y/N) y
You need a passphrase to unlock the secret key for
user: "Ryan Chapin <rchapin@nbinteractive.com>"
4096-bit RSA key, ID E5170CE8, created 2015-03-26
Following is a quick how-to on compiling and adding addition SELinux modules.
When configuring and deploying new and/or custom services on systems that are enforcing SELinux you will likely have to compile addition SELinux modules.
This how-to includes how to go through each step of compiling a new module one-by-one; similar to the model of breaking down the compilation of C and C++ into it’s composite steps.
Step 1: Gather the audit.log entries
You will need to determine which action(s) that SELinux is blocking. To do so, you can tail the /var/log/audit/audit.log file. You will see something similar to the following
There are a number of tutorials online for adding a new disk to a machine and then extending an existing LVM partition to use the new device.
This particular tutorial covers the use case of adding a new disk to a Linux server and then creating a NEW LVM partition on it without modifying the existing devices and LVM partitions.
The first thing you will need to do is add the physical device to the server (or VM).
Then, you need to confirm that the OS can ‘see’ the device. The following command will show you the list of avaiable disk devices.
Here, we see that the OS can ‘see’ the /dev/sdb device. For the rest of this tutorial, we will assume that your new device is /dev/sdb.
Using fdisk, create a primary partition on the new device
# fdisk /dev/sdb Welcome to fdisk (util-linux 2.23.2).
Changes will remain in memory only, until you decide to write them. Be careful before using the write command.
Device does not contain a recognized partition table Building a new DOS disklabel with disk identifier 0xc78ce5fd.
Command (m for help): n Partition type: p primary (0 primary, 0 extended, 4 free) e extended Select (default p): p Partition number (1-4, default 1): First sector (2048-157286399, default 2048): Using default value 2048 Last sector, +sectors or +size{K,M,G} (2048-157286399, default 157286399): Using default value 157286399 Partition 1 of type Linux and of size 75 GiB is set
Command (m for help): w The partition table has been altered!
Calling ioctl() to re-read partition table. Syncing disks.
After partitioning re-run fdisk to list the partitions
# fdisk -l
Disk /dev/sdb: 80.5 GB, 80530636800 bytes, 157286400 sectors Units = sectors of 1 * 512 = 512 bytes Sector size (logical/physical): 512 bytes / 512 bytes I/O size (minimum/optimal): 512 bytes / 512 bytes Disk label type: dos Disk identifier: 0xc78ce5fd
Device Boot Start End Blocks Id System /dev/sdb1 2048 157286399 78642176 83 Linux
# vgcreate centos_repos /dev/sdb1 Volume group “centos_repos” successfully created
Execute the vgdisplay command to list all of the Volume Groups
# vgdisplay
— Volume group — VG Name centos_repos System ID Format lvm2 Metadata Areas 1 Metadata Sequence No 1 VG Access read/write VG Status resizable MAX LV 0 Cur LV 0 Open LV 0 Max PV 0 Cur PV 1 Act PV 1 VG Size 75.00 GiB PE Size 4.00 MiB Total PE 19199 Alloc PE / Size 0 / 0 Free PE / Size 19199 / 75.00 GiB VG UUID FDgd3y-keqV-riq6-vb46-C2F5-JJa2-Ew2DW4
Create a LVM Logical Volume (LV). In this case I am going to use the entire drive
# lvcreate -n repos –size 74.9G centos_repos Rounding up size to full physical extent 74.90 GiB Logical volume “repos” created.
lvdisplay will list all of the existing Logical Volumes
# lvdisplay … — Logical volume — LV Path /dev/centos_repos/repos LV Name repos VG Name centos_repos LV UUID pvNLX4-3wTf-2eMY-RebF-WnFU-8y9F-BRidMn LV Write Access read/write LV Creation host, time nebula, 2017-10-20 17:36:38 +0000 LV Status available # open 0 LV Size 74.90 GiB Current LE 19175 Segments 1 Allocation inherit Read ahead sectors auto – currently set to 8192 Block device 253:4
Now we need to format the LV. In this case we will use ext4, you may choose another filesystem format. Be sure to use the LV Path returned by lvdisplay.
# mkfs.ext4 /dev/centos_repos/repos mke2fs 1.42.9 (28-Dec-2013) Filesystem label= OS type: Linux Block size=4096 (log=2) Fragment size=4096 (log=2) Stride=0 blocks, Stripe width=0 blocks 4915200 inodes, 19635200 blocks 981760 blocks (5.00%) reserved for the super user First data block=0 Maximum filesystem blocks=2168455168 600 block groups 32768 blocks per group, 32768 fragments per group 8192 inodes per group Superblock backups stored on blocks: 32768, 98304, 163840, 229376, 294912, 819200, 884736, 1605632, 2654208, 4096000, 7962624, 11239424
Allocating group tables: done Writing inode tables: done Creating journal (32768 blocks): done Writing superblocks and filesystem accounting information: done
Now you can mount the file system as usual and/or add it to /etc/fstab.
I am working on a VM that is running GNOME under RHEL 7 and I typically run with 12 workspaces. The default GNOME install only has the keyboard shortcut configurations up to “Switch to workspace 4”.
It turns out that the solutions is to use the gsettings cli tool to add additional shorcuts.
$ gsettings set org.gnome.desktop.wm.keybindings switch-to-workspace-5 "[\"<Control>F5\"]"
$ gsettings set org.gnome.desktop.wm.keybindings move-to-workspace-5 "[\"<Alt>5\"]"